How to delete AWS resources created by HOP
This guide shows how to delete all the AWS resources created by the HOP CLI. Most of the resources will be deleted in batch by Cloudformation. But some require manual steps due to the accidental data loss protection mechanism that Cloudformation enforces.
Some of the following steps depend on each other, so make sure you follow them in the described order.
Disable the delete protection to the RDS DB instance
The DB instance will be deleted by Cloudformation, but the delete protection has to be disabled first.
Note
If you did not enable the :persistence-sql profile in the
settings file, no RDS DB instance was created. So you
may skip this step.
Go to the RDS Console and find the HOP database instance. HOP uses one database instance per provisioned environment (testing and production), so be careful and choose the one you want to delete. Then click on “Modify”.

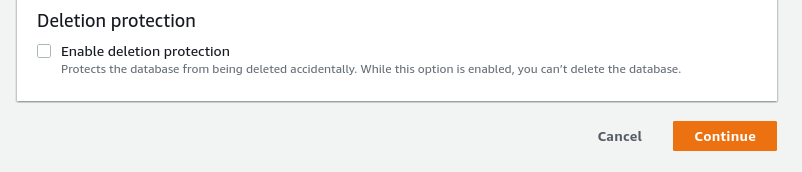
Find the “Enable deletion protection” checkbox (usually at the end of the page) and uncheck it. Then click on the “Continue” button.
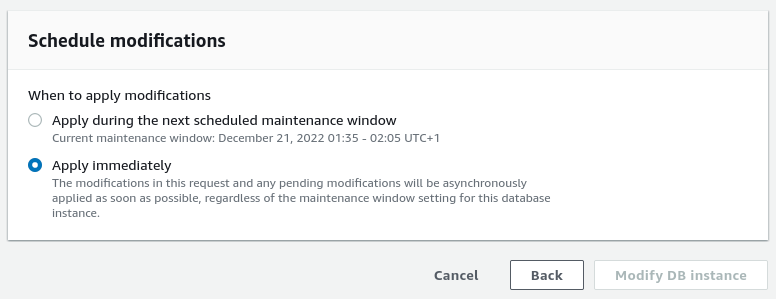
RDS will ask you when the change should be applied. Under “Schedule modifications” select “Apply immediately” and click on “Modify DB instance”.
Delete the Cognito User Pool
Cloudformation will not delete the Cognito User Pool, so it has to be deleted manually.
Note
If you did not enable the :auth-cognito profile in the
settings file, no Cognito User Pool was created. So you
may skip this step.
Go to the Cognito Console, select “Manage User Pools” and then find the HOP User Pool. HOP creates one User Pool per environment (development, testing and production), so be careful and choose the one you want to delete. Then click on “Delete”.

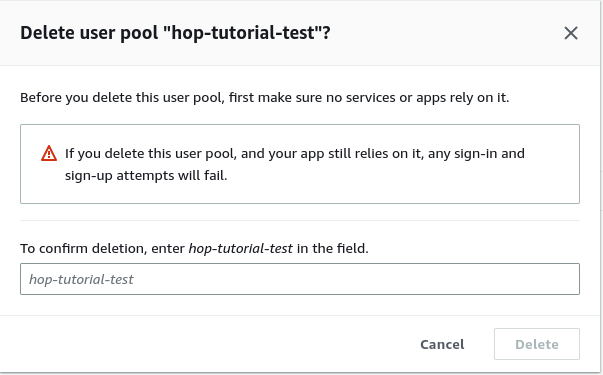
Cognito will ask you to retype the name of the User Pool to ensure you are deleting the expected one.
Cleanup AWS Elastic Container Registry repository
The AWS Elastic Container Registry (ECR) HOP project repository is shared among the testing and production environments. So you should only perform this step if you are completely deleting a HOP project. Skip this step if you just want to delete one environment.
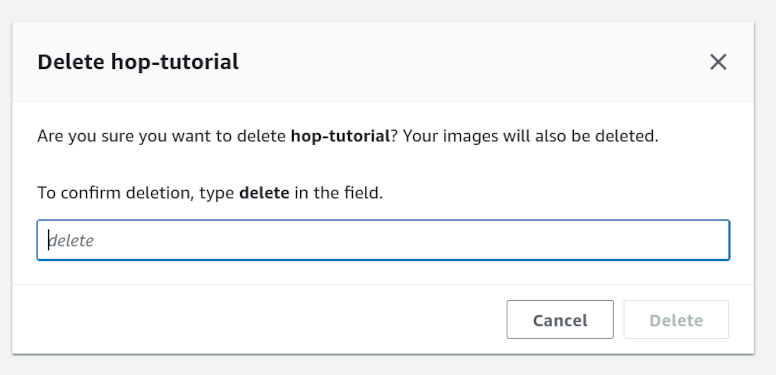
Go to the ECR console and find the HOP project repository. Select it and click on “Delete”. ECR will ask you to type delete to confirm the repository deletion and all the Docker images contained in it:
Delete environment variables in SSM Parameter Store
The environment variables stored in the SSM Parameter Store must be deleted manually too. They can be deleted manually from the AWS Console, but using the HOP CLI is more convenient.
The aws env-vars sync sub-command is used to sync the environment
variables between a local file on disk and the variables stored in
the SSM Parameter Store. In order to delete all the environment
variables, you can just provide an empty local file to the command.
Create the empty file empty-variables.env first:
$ cat /dev/null > empty-variables.env
and then use the HOP CLI to sync the local empty file with the SSM Parameter Store:
$ aws-vault exec --region <aws-region> --no-session hop/hop-tutorial-admin -- hop aws env-vars sync --project-name <hop-project-name> --environment <hop-project-eb-environment> --file empty-variables.env --kms-key-alias <hop-project-kms-alias>
where:
<aws-region>is value ofdeployment-target→aws→account→region.valuein the settings file for the HOP project.<hop-project-name>is the value ofproject→name.valuein the settings file.<hop-project-eb-environment>is eithertestorprod<hop-project-kms-alias>is one of the two following values:deployment-target→aws→environment→test→kms→key-alias.value.deployment-target→aws→environment→prod→kms→key-alias.value.
depending on the value of
<hop-project-eb-environment>.
When you execute the command, it will output which environment variables were created, which ones were updated and which ones were deleted:
$ aws-vault exec --region <aws-region> --no-session hop/hop-tutorial-admin -- hop aws env-vars sync --project-name <hop-project-name> --environment <hop-project-eb-environment> --file empty-variables.env --kms-key-alias <hop-project-kms-alias>
{:success? true,
 :sync-details
 {:to-update [],
  :to-create [],
  :to-delete
  [{:value "4096m", :name "MEMORY_LIMIT_APP"}
   {:value "128m", :name "MEMORY_LIMIT_PROXY"}]}}
You can find more information about the command in the HOP Command Line Interface tool (HOP CLI) reference document.
Delete the Cloudformation stacks
At this point you are ready to delete the Cloudformation stacks. First go to the Cloudformation Console.
To find the stacks more easily, uncheck the View nested filter
that is placed next to the search bar.

HOP uses up to five different stacks for creating it’s resources:
Development environment stack:
This stack should be deleted if you want to remove AWS resources used by the local development environment, for the given HOP project.
The default name for the stack is
hop-project-dev, but you might have renamed it in the settings file.
Testing environment stack:
This stack should be deleted if you want to remove the testing environment, for the given HOP project.
The default name for the stack is
hop-project-test, but you might have renamed it in the settings file.
Production environment stack:
This stack should be deleted if you want to remove the production environment, for the given HOP project.
The default name for the stack is
hop-project-prod, but you might have renamed it in the settings file.
Project stack:
This stack is shared among all the environments of a given HOP project.
So this stack should only be deleted if you want to completely remove a HOP project from your AWS account.
The default name for the stack is
hop-project, but you might have renamed it in the settings file.Make sure you have deleted all the project environment stacks before deleting the Project stack.
Account stack:
This stack is shared among all your HOP projects, so it should only be deleted if you want to completely remove HOP from your AWS account.
The default name for the stack is
hop-account, but you might have renamed it in the settings file.Make sure you have deleted the rest of the HOP stacks (for all HOP projects) before attempting to delete the Account stack.
For each stack, Cloudformation will ask you to confirm that you really want to delete the stack.
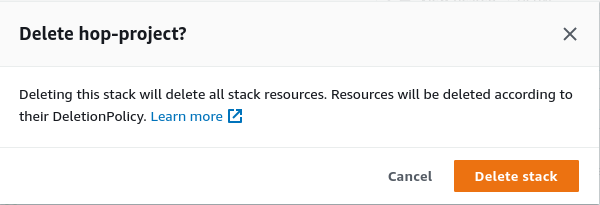
Take into account that deleting each stack might take several minutes.
Note
Make sure you wait until a given stack is completely deleted before attempting to delete a stack that depends on it. E.g., wait until the Development environment stack is fully deleted before attempting to delete the Project Stack.
Otherwise you may get Cloudformation errors saying that some depending resources could not be deleted, and the stack dependent stack will not be deleted.
Warning
Make sure you only delete the stacks that you expect. Even if you have never used Cloudformation explicitly, there are certain AWS services (e.g., AWS Elastic Beanstalk) that use Cloudformation underneath and create stacks on your behalf.
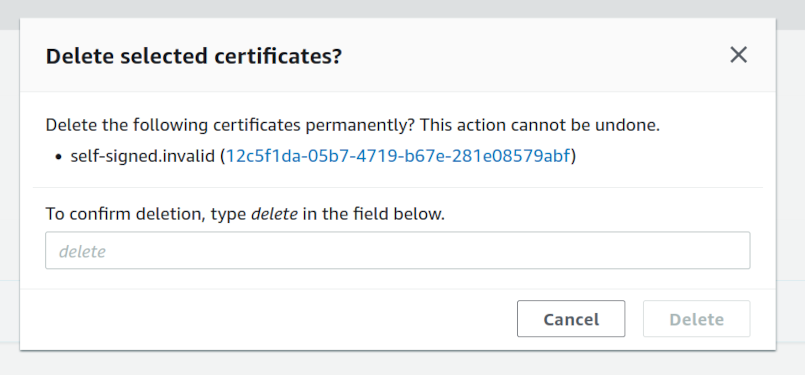
Delete the self-signed certificate from Certificate Manager
The HOP CLI creates a self-signed SSL certificate and imports it into the Certificate Manager. In order to delete it go to the Certificate Manager console.
Find the certificate whose Domain name is self-signed.invalid
and delete it.

The Certificate Manager will ask you to confirm that you really want to delete the certificate.
Delete the RDS DB instance snapshot
Cloudformation will create a database snapshot before deleting the RDS DB instance. If you are not interested in keeping it, you can remove it from the RDS Console.
Note
If you did not enable the :persistence-sql profile in the
settings file, no DB instance snapshots was created. So
you may skip this step.
In the RDS console sidebar go to Snapshots, and find and delete
the snapshot.